
This isn’t a moan – it’s more annoyance at myself for putting myself through yet another learning curve. Laser scanning is a big ‘subject’ and it’s not a new technology so coming in at this stage means you have a lot of catching up. Things that pro’s take for granted are not obvious to us newbies and having nobody nearby to bounce questions and ideas off can make things frustrating – perhaps that’s the best way to learn. No pain no gain.
Once you have your scans registered and indexed (see ‘When It All Goes Right’) …
If you want to convert your scan to a mesh model (which I assume most architecture students will) then there is a strict procedure you need to follow:
1 – Publish your project to your A360 account
2 – Request that AutoDesk generate a mesh from your scans that you can download .. .simple … well not quite.
Publishing uploads your scan project and it is where you can share it with others too.
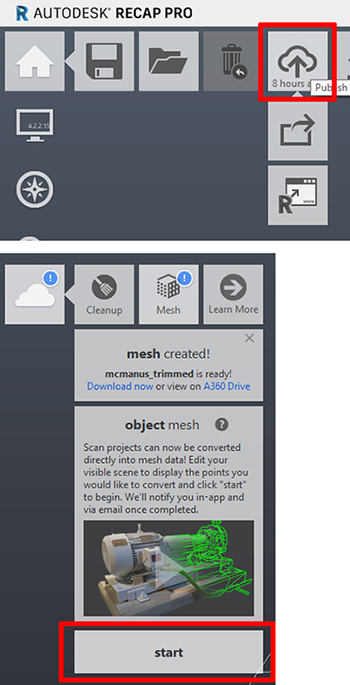
To start publishing either click on the home button and move along to the cloud icon or go down to the cloud icon, select the Mesh option and then start from the dropdown that appears.
This might be when you encounter the first pretty damned big hurdle – you might get this message or the one at the top of this page:

1 – The limits (bounding volume) of your project MUST be no bigger than 30m (30,000mm) in either the X, Y or Z directions
2 – The maximum number of scan stations within that limit box (where you stood the scanner) must be 20 or less.
It’s not one or the other … it’s both.
Adjusting the bounding box is a fairly easy operation … but this might massively increase the amount of work you need to do later. The stair I was scanning fits inside a 30m cube – that was just luck – but imagine you were trying to scan the side of a long building … it’s going to need to be split in to numerous portions and re-assembled later.
The number of files kicking around gets chaotic. I found one person on line who thought the 30m was 30 million points … luckily that is not the case – it’s 30 metres.
I was not aware of either of these rules when I started my McManus scan. If I had been I might have scanned a bit more conservatively – less stations. The subject here is a very complex form – in plan and elevation – I actually don’t think I could have captured it with 20 or less stations but I will be revisiting it to see if I could. That’s how you learn I suppose. I am coming to terms with just how much range the device has but also keeping an eye on the plan view on the iPad is crucial – looking for those black occluded areas.
No mention of limits or number of scans here:
https://knowledge.autodesk.com/search-result/caas/CloudHelp/cloudhelp/2017/ENU/Reality-Capture/files/GUID-57EE9105-057A-41F9-B5E1-D6268E1E92AE-htm.html
or here … Official YouTube playlist for Recap Pro Mobile:
https://www.youtube.com/playlist?list=PLQOxJKbIe-751XHeWKy73qsgOQcHz-oN3

This video does mention both limitations
https://www.youtube.com/watch?v=Zizj7Cv6uJ8
… as usual I had watched the first two and not the third when I started my first big scan. Typical.
Let’s look at how you get over these two pretty major ‘considerations’.
Clicking the OK button on the error/warning message automatically brings up the ‘Limit Box’ tools.
Here’s what it looks like as you adjust the bounding box.
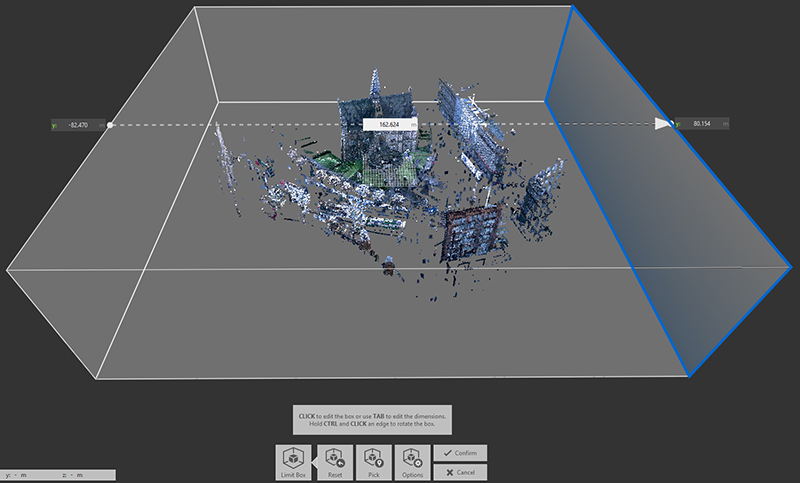
It is easy to drag the edges – but it does not allow you to type in a number. You can rotate the limit box by holding CTRL and dragging one of the vertical edges but again you can’t type in a rotation angle – you just have to do this ‘by eye’.
The limit box does not fully dispense with extraneous points – they are just hidden from view note.
Here’s how mine ended up:

That deals with the ‘size’ of the scan area – assuming you only need one portion but what do you do about the number of scans.
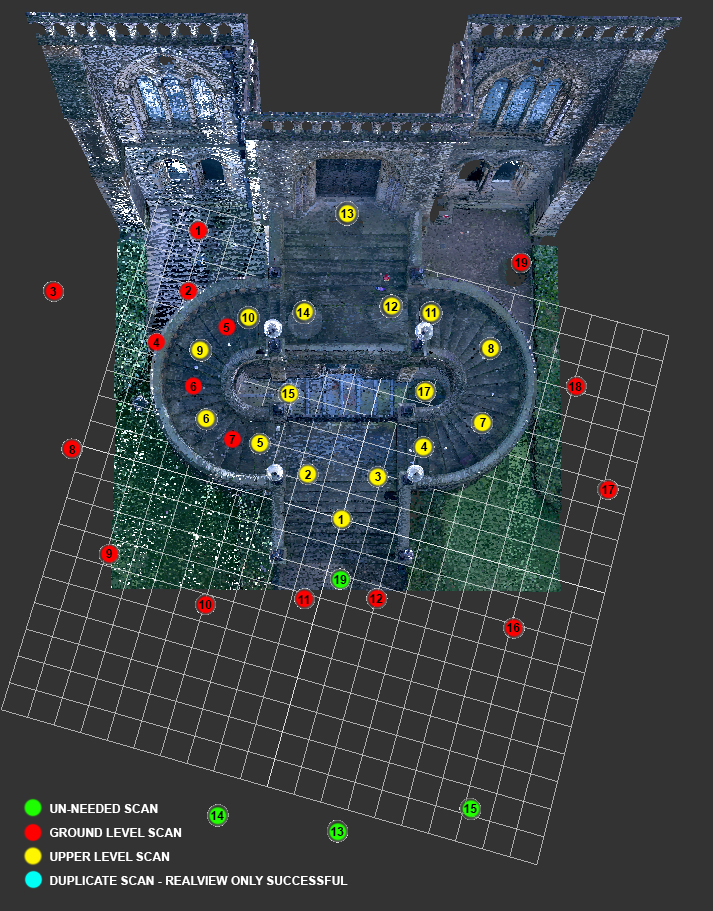
This image shows where I took my scans and the order I did them in:
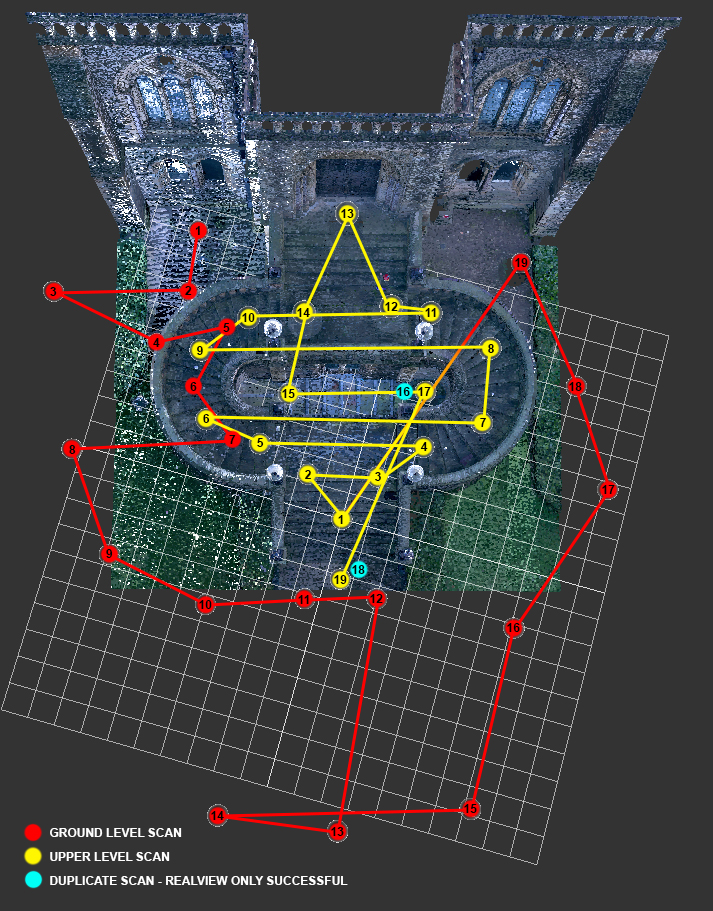
It does look a bit chaotic but I was thinking on my feet and trying to avoid missing anything.
Corresponding the scan numbers to get your head round things is vital – having this diagram was really useful.
 In Recap on the desktop you can see a list of the scans using the little paper stack icon bottom right (it’s real name is the ‘Project Navigator’). This is the most frustrating bit of the software I found so far … the list that pops up is devilishly tricky to make ‘stick’ in place and stay the size you want it to.
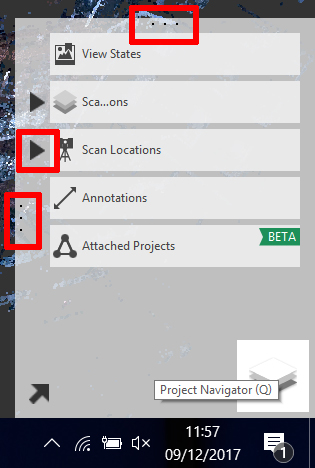
Drag the ‘3 dot’ symbols to resize … but there’s no lock on it so it just pings back if you are not super accurate with your cursor positioning – very frustrating.
Use the drop down arrows to reveal lists of Scan Locations and Scan Regions (saved portions of the scan – note that the points can be from scans from different locations).

Clicking the eye icon disables the chosen scan.
Note – if you hover on the name of a scan it reports the number of points that are in that scan. Quick calc – say an average of 7 million scan points per scan x 38 = 266 million points … no wonder the project folder is 7.3 gigabytes!
Once you have disabled enough scans to get to 20 you are good to go … but which ones do you disable … it is very difficult to know which points are on which scan – many are duplicates of course but you can’t rely on a point necessarily being in more than one scan.
I decided to try and separate upper area from lower – it was how the scans were done because on scan 19 the Recap moble app decided to bomb out on me – so I ended up with 2 projects on the tablet. Thinking back now – perhaps it did not crash … maybe it was simply refusing to scan the 20th scan … oh man … it has to be. It’s too coincidental.
This is why I am doing the blog – to hopefully head off frustrations for you the reader/scanner.
Back to the story …
This is how I decided to separate the project – did 2 ‘save as’s’ – an Upper portion and a lower portion and decided to see how that would go.
Time to publish both:
You will be prompted for a name for your project (even though it already has one) – remember the same scans can be used for different projects.
There’s a quite insignificant little drop down arrow there next to ‘select scans’ – this allows you to decide again which scans get uploaded.
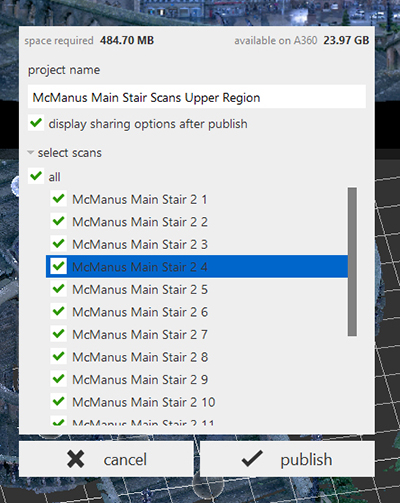
The Project Navigator scan location list seems to be the key to getting permission … this list however is where the actual decision to upload is made – and can therefore save a lot of upload time (and A360 drive space) as you are limiting the amount of data sent up to the cloud.
Once happy – hit publish.

All being well you should see some activity in the top right of your screen – a progress indicator will appear
I was on a home broadband connection when I tried this particular upload – a 600kbps average upload speed … ouch!
This upload took the best part of 3 hours and it was only the top half of the project.
 It’s logistics like a dodgy connection that could add a lot of frustration to this process. On campus the upload speed at quiet times of the day is a massive 30 Mbps … 50 times faster than the connection I was using.
Things that appear as errors can sometimes just be connection problems – keep trying!
Watch out for ‘reception’ speed – this is how fast the info can go in to the cloud server – it is having to deal with ‘requests’ from around the globe simultaneously so it might not be able to take the data in as fast as you can send it.
There’s no fanfare for when your info has been uploaded – you just need to keep an eye on the progress indicator or look at your A360 files page. And likewise there is no indication as to what you do next. So …I will tell you:
 Once the data is up on the A360 server you must then request a Mesh be generated – there’s no dialogue boxes (I have seen) where you can look at your projects on A360 and then choose which one you want to make a Mesh from.
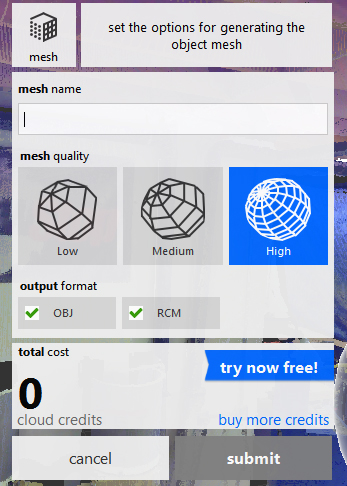
Add a mesh name, quality of mesh, and output formats.
.OBJ is a very common 3D model file format, you will receive a jpeg material that has been UVW mapped on to the model, the material comes from the 360 photographs.
Make sure you import your .OBJ with the UVW mapping button ticked or your material will not show up.
.RCM is Recap Memento file format – Autodesk’s software for cleaning up meshes, 3d printing etc – not sure if this is on general release as yet.
See the blog page ‘When It All Goes Right’ for visuals showing comparisons of models at different scan resolutions and mesh quality levels.
It is my understanding that this service is in Beta mode at the moment to try and generate interest and therefore there is no Cloud Credits charge currently incurred.
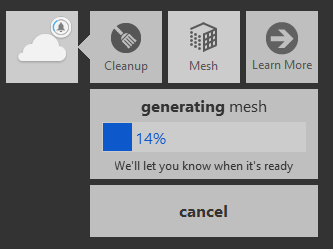
Here’s your progress indicator. Don’t expect instant turnaround. The servers are dealing with many many scans simultaneously – they will get round to yours. This is why you will receive email notification.
It was like the night before Christmas … I hit the hay and had a restless night in anticipation of there being messages to say ‘your scans are ready’.
The AutoDesk elves had been working hard in the small hours and sent me email notifications:

Still excited until I opened the emails:
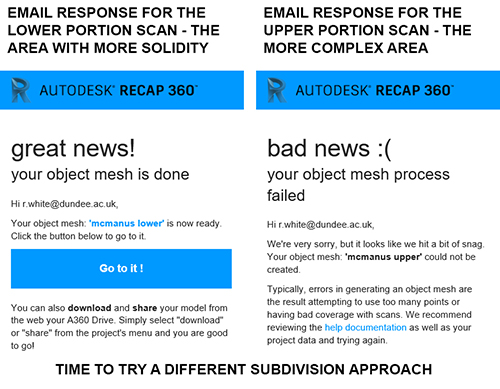
This is where that instant dejection sets in and mystery. As you can see from the failed scan it offers absolutely no advice on what it was the caused the failure.
