So far the subjects I had scanned were stone structures, I decided to try something a bit more modern, more planar and bigger. The building I chose is called the Dalhousie Building – it is a relatively new teaching facility on the main campus of Dundee University. The students were away for their winter break so it was a very good opportunity to get unhindered access to the building.
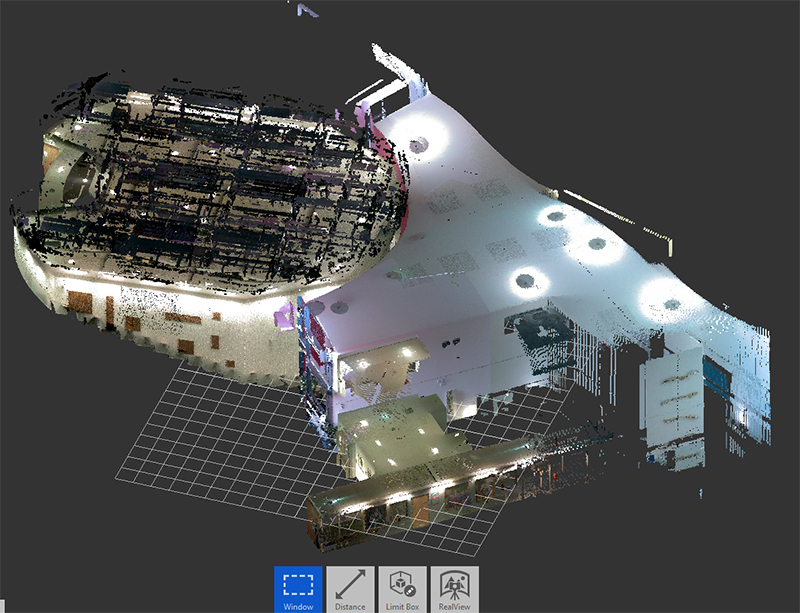
Rather than make you read to the very end until you see some visuals … here’s the video of the ‘final’ point cloud.
Below is an ordnance survey location plan of the Dalhousie Building

My aim was to see if I could generate scans that gave the viewer the route from outside to inside (or vice-versa). I started with the lecture theatre as the first day I was able to scan was wet and misty. Neither of those climatic conditions suit the scanner. It was also very cold – 0 degrees centigrade – a bit lower than the scanners specified working temperature range so a bit of indoor work sounded preferable.
This plan shows the routes I took for my scans. They weren’t all done on the same day as I ran out of time and out of light.
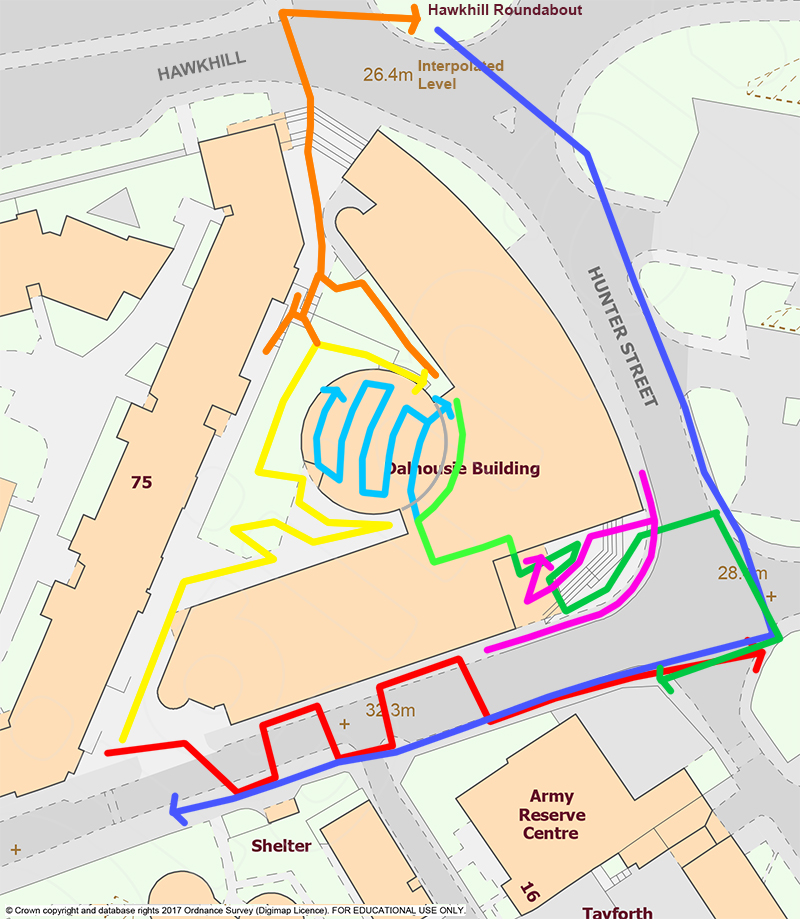
Day 1
1 – Pale Blue – first floor lecture theatre route – (28) 3 + 2
2 – Green – lobbies at ground and first floor – (5 + 6) 1 + 1
3 – Dark Green – failed external route – bad light – (11) 1 + 1
Day 2
4 – Red – failed external facade – harsh light/poor registration – (10) 1 + 1
5 – Pink – corner steps at entrance – large overlaps in better light – (14) 2 + 0
6 – Blue – mostly successful external facades – scans 1-4 un-useable – registering too high off the ground – (11) 2 + 1
Day 3 – see page: First ‘Large’ Project – Part 2
7 – Yellow – courtyard high level – ‘push-button’ scans – (21) 1 + 2
8 – Orange – courtyard low level – ‘push-button’ scans – (22) 1 + 4
The first number in brackets is the number of scans that were eventually used (or discarded), the second number is the approx. number of hours spent scanning – the third number is the time spent later on the PC tidying up or retrying registration. You can see that the ‘push-button’ scans required more time in the registration process – more on this in ‘Part 2’.
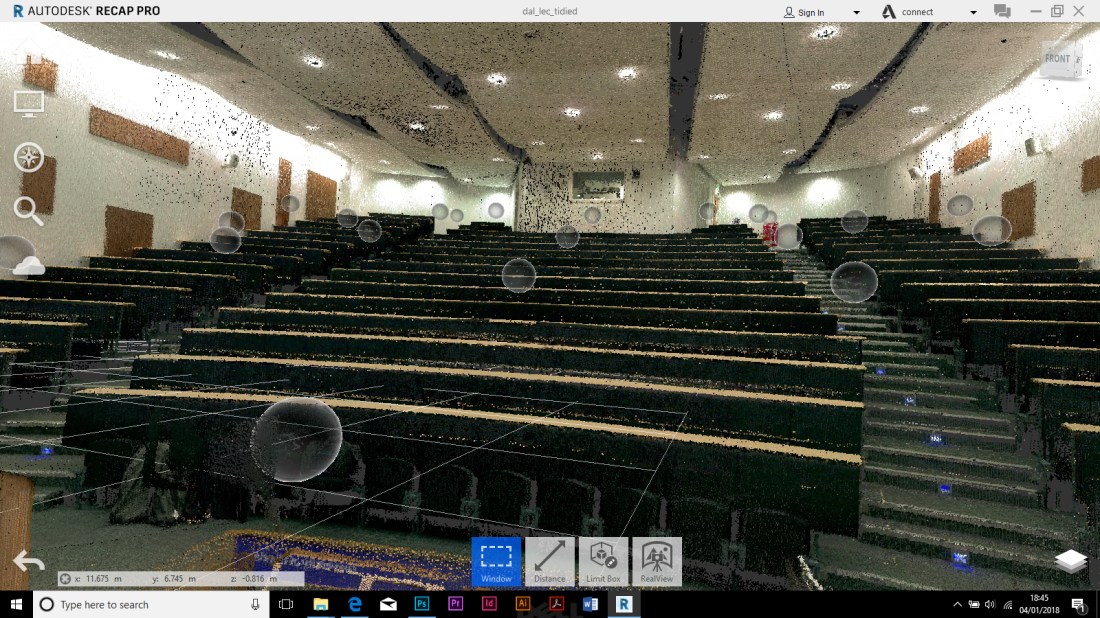
Day 1 – Scan Route 1 – Lecture Theatre
The main lecture theatre is on the first floor of the building (1 up) – it is an interesting plan shape, curved desking and an elegant layered flowing suspended ceiling.
My understanding of the instruction material I had seen to date were pretty clear that dark surfaces are bad and light (non-reflective) ones will give the best results. Indoors in the lecture theatre and galleries around it this was very true. The registration of the scans was generally fully automatic and the limited number that needed human intervention were easy to work with. The sound baffle panels on the walls were very useful for doing manual registration.
Since I wanted to create a point cloud that showed me accessing the lecture theatre I started with a curved line of scans, approx. 5m apart that went from lobby, through doors (wedged open) across the theatre ‘stage’ area and out the other door the far side of the lobby.
From the graphic below you can see the route taken

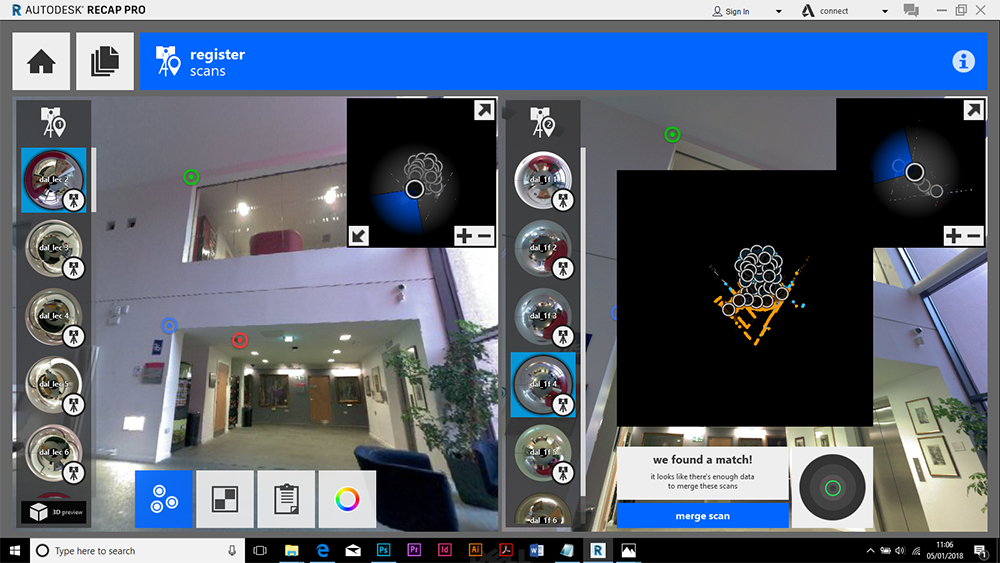
– the first scan that needed to be manually registered was scan 6 to scan 7 (see image below) – this was because there was low overlap having the scanner sited in the door alcove.
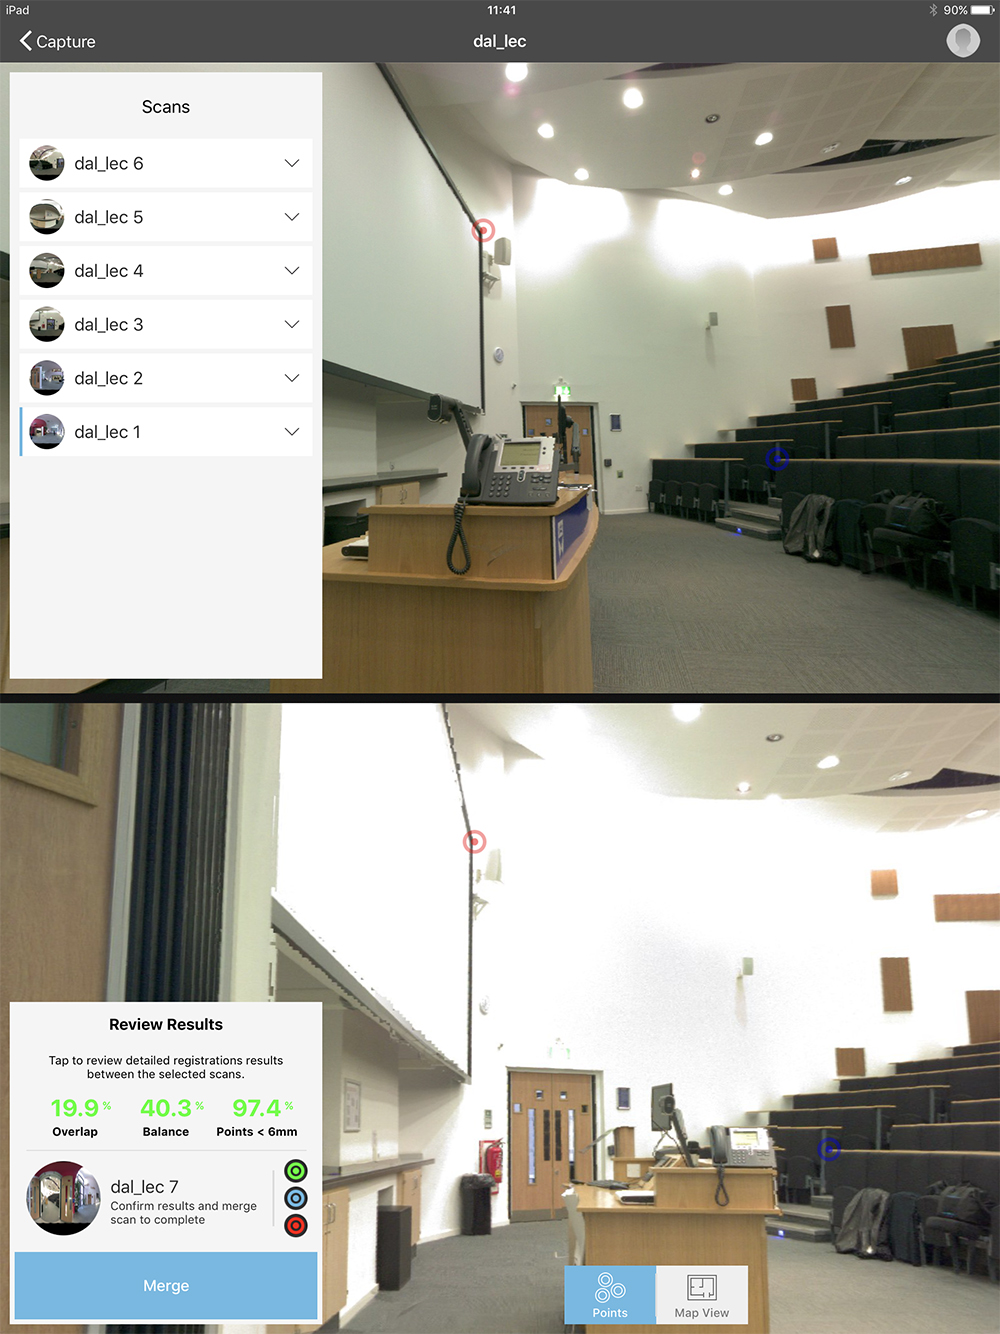
Scan 7 to 8 was automatic but now I wanted to scan methodically inside the lecture theatre but the last scan done was outside it (scan 8). You must accept that manual registration is required here as scan 8 is not going to overlap with scan 9 to any useable level. The software alerts you that manual registration is required but you can chose any of your scans done so far to register with – so here we drop back to scan number 6.
Other scanning issues encountered in this space were:
The number of steps – the ‘risers’ (the vertical part of the step) scans easily as it is perpendicular for the most part to the laser beams – the ‘treads’ (the horizontal part) is more difficult to scan – additional scans just working down the two aisles of steps were required.
The same issue goes for the shiny wooden desktops – in a few areas these have not been picked up brilliantly.
The other problem in this room is the dark fabric to the seats – a little bit of sheen is picked up on the tops of the cushions but the majority of the fabric is invisible to the scanner.
Day 1 – Scan Routes 2 + 3 – Upper and lower lobbies through to outside
The day that I chose to scan internally there was a small conference in the building. The main foyer at ground floor was fully occupied with display panels for research posters – no way was anyone going to move those for me – me who was there un-announced anyway.
There was also the problem of quite a few people ‘hanging around’ – chatting outside of conference sessions getting a coffee, etc. as you can see from this photograph.
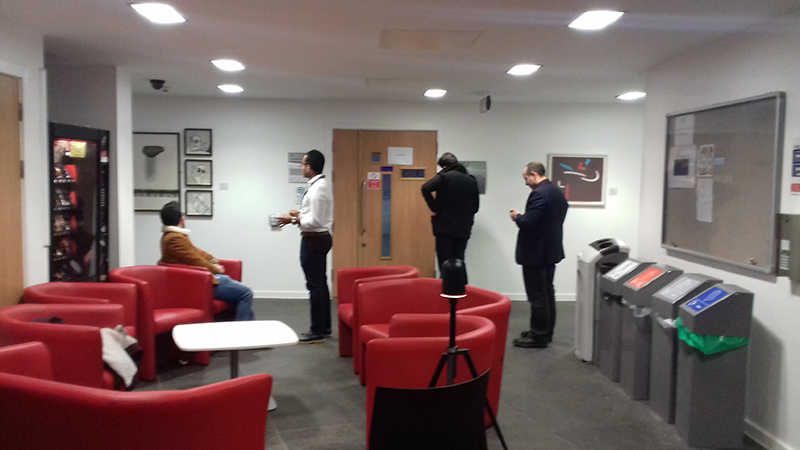
This was not conducive to getting good scans. I also did not have the time (or daylight) to try and scan the whole of the interior – remember the aim here was to navigate from outside to inside or vice-versa.
Scans were registering automatically on the iPad fine until I ventured outside – I experienced poor registration almost straight away – possible causes:
– The light was just not good enough – it was too late in the afternoon (low albedo)
– The architecture of the building did not help – fairly large plain walls
– The openness of the South East aspect was problematic too – features too far away
– Having to work ‘across’ a large open and busy roundabout – cars distracting the scan
You can see below just how bad the registration externally was, there are some portions that are actually upside down.

On plan on the iPad these problems are hard to spot – this is something Leica need to address as you think things are looking OK but actually you are creating a total mess which you don’t discover until you import everything in to the desktop version of Recap.
Notice on the image above how blue those external scans are – this is not surprising as you can see below how dark and blue it was at the time. Low ground reflection is also termed ‘low albedo’.
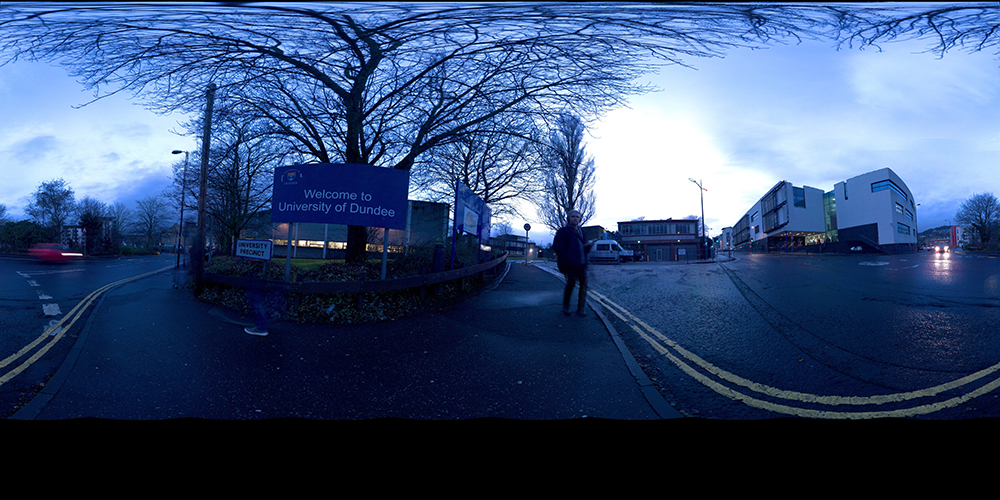
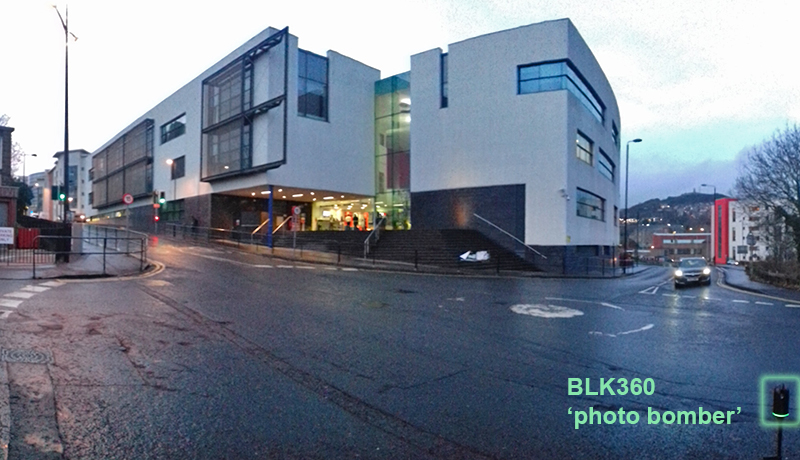
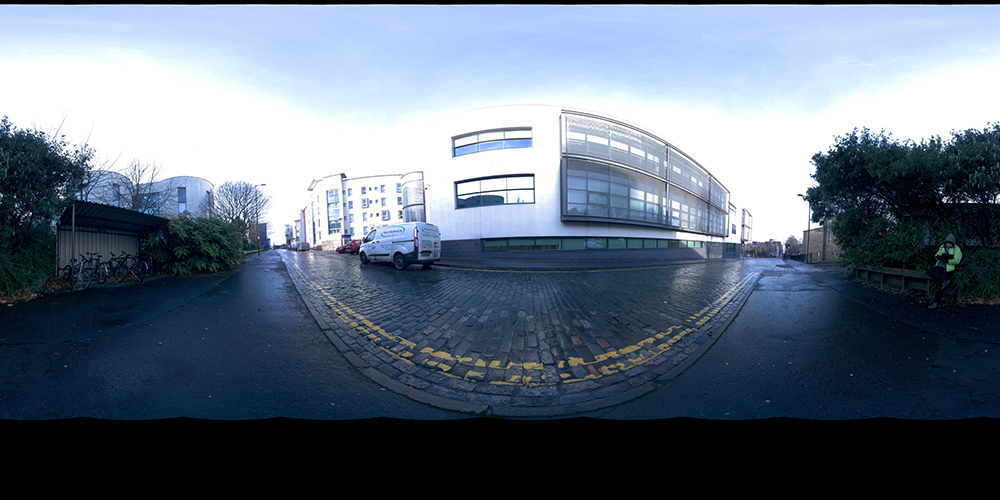
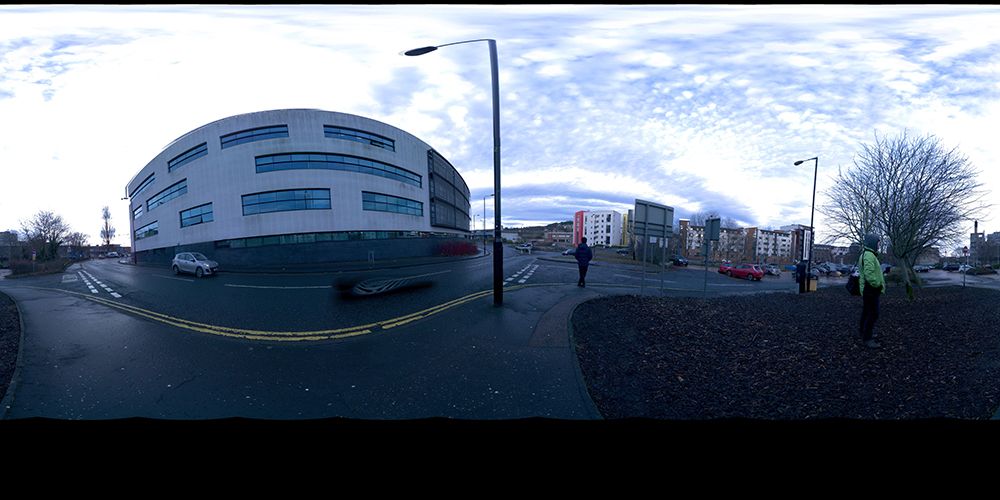
This 360 photo from the BLK360 also illustrates just how far away the station was from the target building – possibly only 5% of the laser points would be hitting the desired target – not enough to get decent overlap – but I could not close a road.
Despite a good 2 hours spent later trying to manually register the late afternoon scans on the PC – I gave up and accepted that a second days scanning was required.
During the evening I tried to combine the Scans from routes 1 and 2.
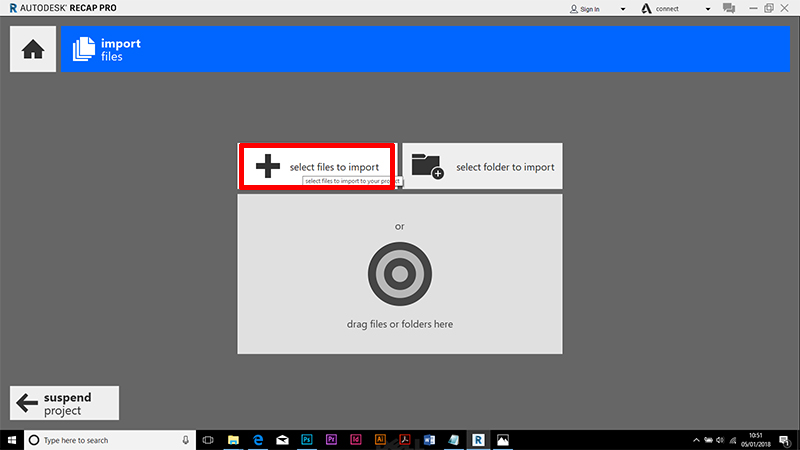
Each project is imported in to Recap Pro on the PC.
Decide which one is going to be the host … I went for the lecture tidied up lecture theatre because I had split the ceiling off to it’s own region and it seemed more logical to bring 6 scans in to 28 rather than the other way round.
You then ‘Import Scans’

Select the .rcp file you want to import
This will pull in the scans that are already registered to each other. Use the button top right to do a manual registration of the two scans you think will be easiest to register to each other:
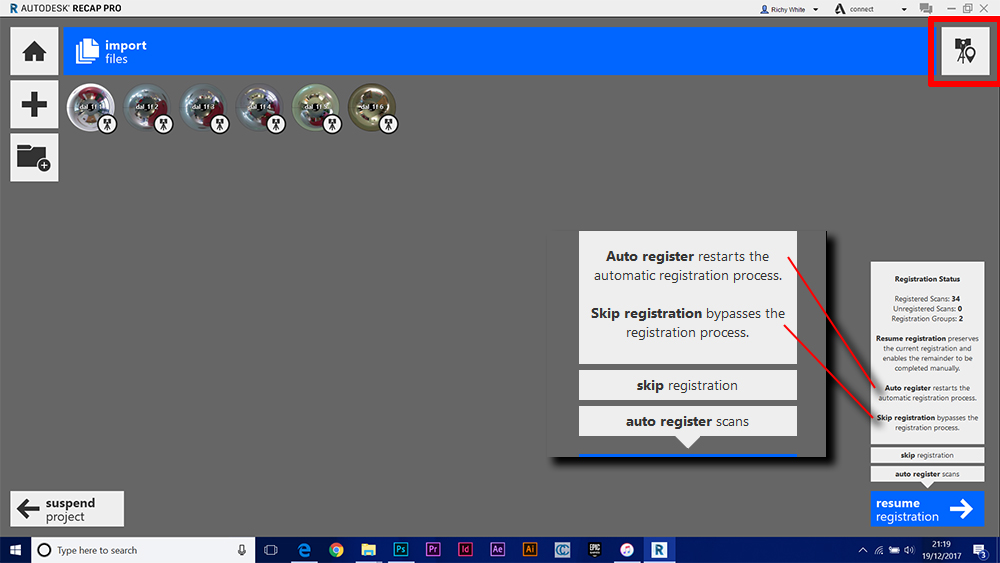
I tried ‘auto-register’ and got this result:

Manual registration was more successful:
Day 2 – Scan Route 4 – Failed external façade.
Day 2 was a beautiful crisp winter morning – surely scanning would be a breeze. It was not to be.
I thought a simple route from the South West corner of the building round to the North East would be appropriate. Some parked cars and vans were an initial obstacle. The second scan did not register automatically … oh no. Then the third scan would not, and so forth.
The white building was highly reflective in places – almost blinding – this I thought was likely to be the issue – the exposure of the 360 Real Views was completely ‘blown out’ in places as you can see below
The fact that this is also a street – i.e. parallel arrangement of forms means that the ‘balance’ component of your registration is compromised too. See page ‘Registration Explanation’.
After about 8 scans that were all very tricky to try and register in the field – I gave up and decided to concentrate on the corner area.
Day 2 – Scan Route 5 – Corner steps at entrance.
I on purposely stayed on the pavement closest to the building and did 8 scans in an arc just 5m apart to maximise the overlap and then moved on to the upper platform for another 6 scans – 14 total. The sun was bright and the low angle was a problem so in some spots I stood strategically casting a shadow on to the scanner. I got about 50% of these scans to register automatically which I felt was a better result.
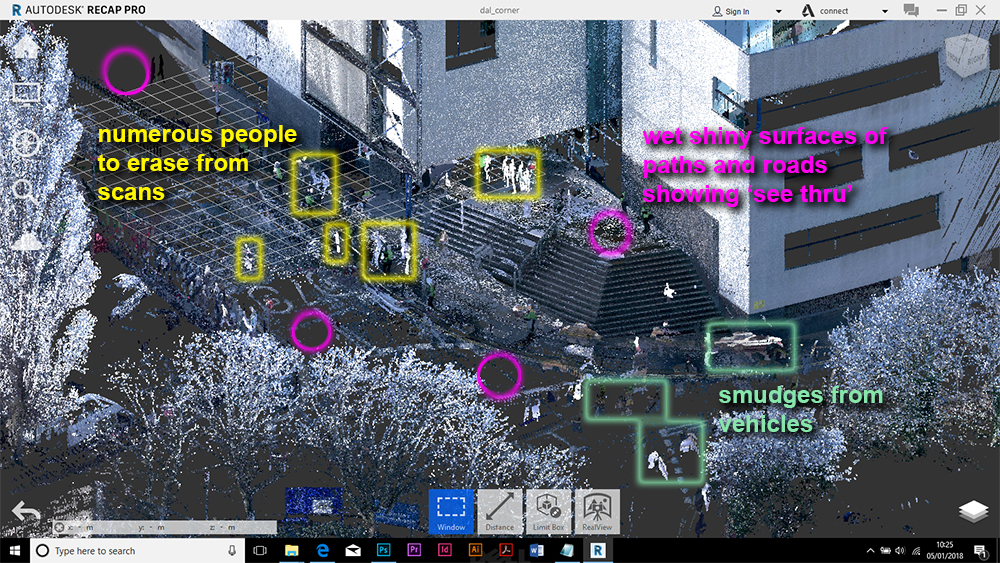
The corner and the roundabout there were busy – people leaving the conference and traffic outside so you can see from the image below that a good deal of cleaning up is required to remove people and vehicle smudges and you can also see how the wet paths and roads became almost invisible to the scanner – luckily the white road markings helped.
Architecturally the scan was a good one. Now to try and expand this to see a bit more of the building.
Day 2 – Scan Route 6 – External Facades
Dropping back across the road and starting from the North East tip of the building I tried to do an arc that went round to the South West.
The light was a bit more friendly – some cloud had come over and the exposure was reduced but still registration had to be done manually on site – for all the scans – I am pretty sure the balance issue was to blame too – the shape of the building and the ‘street’ arrangement. You can’t be sure what causes poor registration unless you had the time to try out different approaches on say 3 scans – I think adjusting the exposure compensation might be worth trying – this is done on the iPad pre-scan.

By now I was frozen – not as cold as Carol Robertson as you can see above chatting to me – her legs had fallen off in a spooky way!
Please go to the next page – First ‘Large’ Project – Part 2 – I have split this off as I tried out the ‘push-button’ scanning instead – really just to see how it went and to hopefully reduce the amount of time spent on site as it was sub zero still.
